
Table of Contents
RV Air Conditioner Repair
This is our updated and the most complete RV air conditioner repair guide. Repairing an air conditioning leak in the RV is important since the air conditioning or climate control system of a vehicle is a key element to achieving ideal environmental conditions inside the passenger compartment. Thanks to this, comfort while driving is substantially increased, to improve the driving experience and safety. A malfunction of this system can affect the driver’s capabilities. Fatigue, tiredness, drowsiness, lack of visibility due to fogging of the windows, etc., when ambient temperatures are extreme, can increase the risk of accidents. One of the most common causes for this system to fail is a gas leak. To remedy this problem, it is important to locate and repair any leaks in the vehicle’s air conditioning and understand how to repair them. Continue reading to learn more about How to Detect an RV Air Conditioner Leak and review our updated guide on RV Air Conditioner Repair.
Most RV air-conditioning problems are caused by consumers failing to replace or failing to replace filters, uncleaned coils, or unlubricated bearings. Read on to learn more about how to detect leaks in RV air conditioners and check out our updated RV air conditioner repair guide.
Frequent Areas of Refrigerant Gas Leakage
In the following paragraphs, we are going to review in detail everything about RV air conditioner repair (RV AC repair) and Frequent Areas of Refrigerant Gas Leakage.
The air conditioning and climate control circuit is a closed and sealed continuous cycle circuit through which a refrigerant gas (R134a and R1234yf) circulates and is not consumed. When it is detected that the gas level is below the stipulated level, the area of gas loss must be sought to repair the air conditioning leak and prevent the system from cooling incorrectly over time.
Although the circuit is designed to be airtight and not leak, it is common that, over the years, the ducts through which the gas circulates and the rubber gaskets that seal the connections deteriorate. This leads to leaks of varying complexity, resulting in a gradual or sudden loss of the ability to cool the passenger compartment. Leaks through the service valves are also common.
In addition, it must be taken into account that the loss of cooling capacity may be due to failures in other components of the circuit such as the compressor, the expansion valve, the condenser, the fan, the filters, or the electrical system, among others.
Identifying A Gas Leak In The Air Conditioner
What Is The Main Breakdown In Air Conditioning?
35% of the mechanical breakdowns that occur in the summer are related to the air conditioning system. The excessive use, although necessary, of the RV air conditioning because of the heat can cause failures, leaks, and breakages in this or other elements.
I encourage you to continue reading our updated guide on RV Air Conditioner Repair to learn about possible failures and repairs for good your RV air conditioner system. With the tips of this article, you should fix it at home, saving thousands of dollars.
The RV air conditioner is an element that is often not paid much attention to when performing maintenance, which is a serious mistake. For example, a breakdown in the air conditioner due to gas leakage would also affect the compressor, and the cost of repair could reach 1,160 USD (€1,000).
While gas leaks are one of the main problems to be taken into account with the air conditioning, you should also pay attention to other details such as the pollen filter, which is recommended to change every 6,200-7,400 miles (10,000-12,000 kilometers).
What Are the Parts of the Air Conditioner?
Next, we see the elements of which the air conditioning of a vehicle is composed mainly:
Compressor: Compresses the gas and sends it under pressure to the condenser. There are different types of compressors (reciprocating, axial, scroll, vane), although the most common are those of variable displacement.
Condenser: It is located in front of the vehicle’s radiator. Its mission is to cool the coolant without a pressure change after the action of the compressor.
Evaporator: It is responsible for absorbing the heat around it to transform it into the cold air and then expelling it through the grilles of the vehicle’s air conditioning.
Expansion valve: It is responsible for allowing the refrigerant fluid to pass to the gaseous state, so it is essential in the cooling process. The most common are the tube and monoblock.
Cabin filter: It is essential to ensure the quality of the air that is breathed inside the passenger compartment, as it is responsible for cleaning impurities from the air conditioning circuit (pollen, dust, oil or dirt particles, etc.).
RV Air Conditioner Repair: Symptoms To Detect Air Conditioning Malfunctions
In the following paragraphs, we are going to review in detail everything about RV air conditioner repair (RV AC repair) and the Symptoms To Detect Air Conditioning Malfunctions.
If the temperature does not drop in a short time, the fluid in the dehydration bottle is at a minimum, or the cabin filter or one of the pipes is blocked.
If it smells unpleasant when you turn it on, it is due to the accumulation of moisture in the ventilation ducts, so the system is likely infected by bacteria, dust, and fungi, with the danger to health that this entails.
If too much mist builds upon the vehicle windows, it may be due to an insufficient gas charge in the system.
Finally, if the amount of air coming into the passenger compartment is less than usual, most likely there is something that is clogging the filter, so it is advisable to clean it of impurities and change it when necessary.
The subject of air conditioning is extensive and we could devote more than one article. Hopefully, this information has been useful to you.
How To Detect Leaks In The Air Conditioning Circuit
In the following paragraphs, we are going to review in detail everything about RV air conditioner repair (RV AC repair) and How To Detect Leaks In The Air Conditioning Circuit.
Since the refrigerant gas is colorless, it is impossible to detect air conditioning leaks with the naked eye. Therefore, methods must be applied that allows the workshop professional to know with certainty the specific point of the leak. The methods for detecting refrigerant gas leaks are as follows:
- By using dye and UV lamp
- By electronic detector
- By applying pressure in the circuit
Finding Leaks In The RV Air Conditioning: An Overview
One of the most common causes of air conditioning malfunctions is caused by leaks in the refrigerant circuit. They imperceptibly cause a drop in the amount of liquid and lead to loss of power or even complete failure. The refrigerant R134a is known precisely because it is distributed through the rubber hoses and fittings. Since the air conditioning mechanic cannot immediately tell if there is a leak or if the loss of refrigerant is simply due to the passage of time, it is essential to carry out an in-depth leak detection.
It should be checked:
- All fittings and hoses.
- Compressor
- Condenser and evaporator
- Filter driers
- Pressure switch
- Service intakes
- Expansion valve
3 methods are recommended for leak detection:
- Dye and UV lamp
- Electronic leak detection
- Foam Gas Detection
How To Detect A Leak By Dye And UV Lamp in an RV Air Conditioner System
This method of leak detection is the oldest of the three methods mentioned above. It consists of adding a fluorescent dye agent miscible with the refrigerant and the oil that is added to the gas charge so that it stains the areas where the refrigerant loss occurs.
After a few minutes of operation of the circuit (5 minutes minimum), the operator can search for the loss. To do this, you have to place a yellow-tinted lens and project ultraviolet light with a specific lamp along all pipes and connections. These lenses protect against UV light and help detect the leak so that where a greenish stain is appreciated, there is a refrigerant gas leak to be repaired.
Its main drawback is that it is not capable of revealing micro-leaks. Therefore, using this system will not always be able to find the leak and repair the air conditioning in the car. The following video shows how to apply this method of identification.
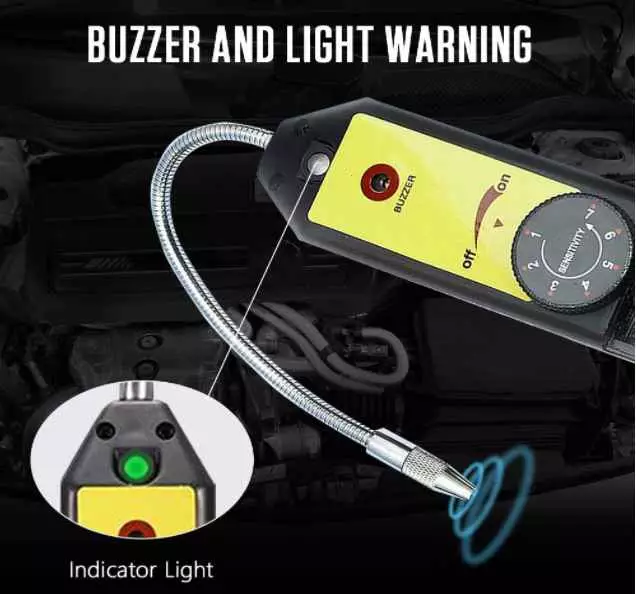
By Electronic Detection
This is a system capable of detecting refrigerant gas leaks immediately and without applying any dye to the charge gas. The device has a probe with adjustable sensitivity that can detect very small leaks (up to approximately 2 g/year).
To check if there is a leak, the probe must be brought close to the possible areas of leakage and wait for the device to return a certain acoustic, luminous, and/or visual signal on its own display (depending on the type of detector). As soon as it appears, the professional knows that there is a leak at that particular point. The most modern detectors indicate the type of leak, classifying them by levels to know more precisely what is the real loss of the system per year.
By Applying Pressure to the Circuit
In this case, the method of identification is to empty the air conditioning circuit and add nitrogen or gas former (composed of 95% nitrogen and 5% hydrogen) at about 12 bar pressure for about 10 minutes to see if the pressure remains stable or leaks occur.
If the pressure is not maintained, it is due to a leak somewhere in the circuit.
The exact location of the leak is done by using electronic detectors or by applying specific leak detection sprays on the different possible damaged areas to reveal the leak through the formation of foam.
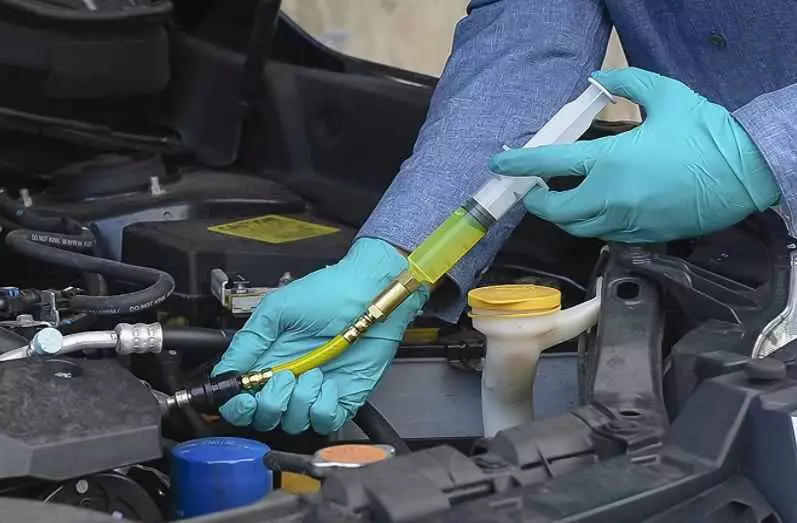
RV air conditioner recharge kit: The equipment for this test consists of a valve kit on which the various hoses are connected and the air conditioning charging station itself, through which the process of vacuum, charging and checking the circuit and working pressures is carried out. In the following link is available a video showing the testing process using gas former.
RV Air Conditioner Repair Guide – How to Repair It
In the following paragraph of this article about RV Air conditioner repair and How to Repair the RV AC. We discussed an effective method for repairing your RV air conditioner and solving any leaks.
Once located, you can repair the air conditioning leak in the RV in these two ways:
- Replacing the damaged part
- Introducing air conditioning leak sealants in the system.
- RV air conditioner recharge kit: Refilling gas as needed (R1234yf vs R134a)
RV air conditioner recharge kit. Of the two options to repair the air conditioning of the car, the most advisable, being the one that will ensure the full correction of the problem, is to replace the damaged part. To do this, the circuit must first be emptied. Then, the damaged part is replaced, and the vacuum and charging process is carried out with the refrigerant gas.
However, specific products are also marketed to plug small leaks (air conditioning leak pluggers), which are sold as an economical solution for these specific cases. To repair an air conditioning leak in the RV with an air conditioning leak plugger, the manufacturer’s instructions must be followed. Generally speaking, however, it is a matter of introducing the product into the low-pressure circuit while the air conditioning system is in operation and then topping up the charge with the appropriate refrigerant gas.
How this RV Air Conditioner Recharge Kit Works
R1234yf vs R134a
How this RV Air Conditioner Recharge Kit Works. Let’s review the gas needed: R1234yf vs R134a. In the last few years, we have had to become familiar with a new fluorinated gas: R1234yf freon. For those of us accustomed to using R134a, this means a thorough adaptation and review of the differences between R1234yf vs R134a.
The R1234yf freon is the new component of the cooling systems of vehicles, which replaces the R134a, and is characterized by its lower level of pollutant emissions.
The switch to this R1234yf refrigerant was decided in many countries as part of the discussion on the handling of fluorinated gases that affect mechanical workshops. R1234yf vs. R134a changes the way air conditioning systems are repaired. Establishments have to quantify the use of these gases. The new standards require a detailed record to be kept by grams of the charging and recycling operations of the air conditioning circuit of vehicles arriving at the workshop between R1234yf and R134a.
Why is R1234yf better than R134a? What are its advantages over R134a?
Although there are several, one of its main improvements is that it has an energy efficiency index of 4, compared to the levels of its predecessor, which was 1.4; or in other words, it pollutes much less.
Since 2011, an international replacement of the refrigerant R134a by R1234yf freon.
R1234yf vs. R134a is one of the main changes established by the European Commission to reduce pollutant emissions from vehicles.
Newly manufactured cars weighing less than 3.5 tons are required by law to have an air conditioning system installed with this fluorinated gas.
Can You Use R134a in a R1234yf system?
Many people frequently ask Can You Use R134a in a R1234yf system. The answer is yes, you can because the systems are compatible. Refrigerant R1234yf freon is environment-friendly, and that is why we prefer R1234yf vs. R134a.
RV Air Conditioner Repair Guide: 4 Methods To Detect Leaks In A Vehicle
Let’s continue reviewing our updated RV Air Conditioner Repair Guide.
A leak in the vehicle is a symptom that one of the components of a system is not properly assembled and is also, more than likely, a prelude to major problems in the future. Hence, the importance of detecting any leaks in time.
During the useful life of a vehicle, many of its parts are subject to knocks, vibrations, or frictions, which, together with the natural wear of the parts themselves, can cause the appearance of leaks. Generally, these leaks are more likely to occur at joints, bolts, or in areas where parts or compartments are joined and sealed.
How to Detect Leaks in an RV – Method 1: Visual Inspection
When we talk about leaks in a vehicle, we are referring to liquid or gas leaks. When the leak is of a liquid, it can be relatively easy to find where it is coming from. For example, an oil or coolant leak can be detected by a simple visual inspection.
However, when it is a gas leak, its detection is more complicated since it is a colorless element and cannot be seen with the naked eye. Therefore, other methods need to be used to detect these leaks, which brings us to the next point.
How to Detect Leaks in an RV – Method 2: Specialized Sprays
In the case of leaks that are more difficult to detect. It is a simple and convenient product to use, which makes it easy to detect possible leaks. Its “modus operandi” consists of forming bubbles in those areas where there is gas leakage.
Among the main advantages of this product are that it is non-toxic, non-flammable, and does not cause corrosion. In addition, it is effective for leak detection in different pressurized gas systems: compressed air, helium, nitrogen, etc., as well as in iron, copper, or plastic pipes.
To use the aerosol correctly, shake the container beforehand and spray the product at a distance of 5-8 inches (15 to 20 cm) over the affected area. Leaks will be visible as the product starts to foam in the affected area. After detection of the leak, the excess product should be wiped off, and the appropriate repair should be made.
How to Detect Leaks in an RV – Method 3: Dye Injection
This is a method based on the use of dye products that react at the site of the leak. In some cases, the kits of these products include special glasses and ultraviolet flashlights to be able to appreciate the color changes.
How To Detect Leaks in An RV – Method 4: Laser and Ultrasound
Although their use is not yet widespread in the industry, there are already leak detectors that allow remote infrared diagnosis so that there is no risk to health in the event of a leak of a hazardous product.
More common are ultrasonic leak detectors, generally used to detect leakage problems in the vehicle compartment.
Finally, we must remember that to detect leaks related to combustion engines, mainly gasoline, we can also count on the invaluable help of diagnostic machines.
In this article, we have not gone into all the details, but we hope that these 4 methods have been useful to you.

Conclusion about RV Air Conditioner Repair
Most RV air conditioning problems are caused by consumers failing to change filters or not replacing filters, not cleaning coils, or not lubricating bearings.
RV Air Conditioner Maintenance. The RV AC systems will survive a long time if the users are diligent in doing these easily planned maintenance procedures. As a result, practically all issues with these devices may be traced back to the lack of regular planned maintenance.
RV Air conditioning devices are essential in RVs, but they cannot operate indefinitely. Most of the problems that people encounter when using RV air conditioners can be avoided by regular RV air conditioner maintenance and cleaning. If you can stick to a six-month cleaning plan, you may not encounter most of the above problems. The majority of problems with RV air conditioners may be avoided with regular maintenance and cleaning. If you can keep to a six-month cleaning plan, you’ll be able to avoid most of the problems outlined above.
If you have not performed any camper AC maintenance on your equipment for some time, you may encounter some of the above problems. Opportunely, most of the AC problems are easy to fix. Remember that your AC equipment should not be handled while it is running or plugged into a power source.
If there is a problem with the AC circuit breaker, thermostat, or other electrical components, don’t hesitate to get in touch with a professional technician or call your RV air conditioner manufacturer for processing. So, next time you encounter any of these RV air conditioning issues, I am sure you will know what to do.
You may be encountering any of the difficulties listed above if you haven’t done any maintenance on your unit in a while. Fortunately, the majority of them are simple to repair.
Here are some conclusions on RV Air Conditioner Repair and How to Detect Leaks in the RV. The vehicle’s air conditioning system has a direct impact on the driver’s comfort and visibility at the wheel, so its influence on active safety is relevant and must be taken into account. The most common cause of failure in the air conditioning system is leaking in the circuit.
To correct the problem, the gas leak must be located with a reliable detection system and then rectified, preferably by replacing the damaged part.
In addition, RV air conditioning systems are prone to generate bad odors and accumulate a multitude of bacteria and germs, so it is highly recommended to use specific disinfectant cleaners to improve the environment inside the passenger compartment.